Showing posts with label finished quilt. Show all posts

Saturday, February 14, 2015

Saffron and Cyan {2 finished quilts!}

IMG_8273-001

The DCMQG has a tradition of making quilts for new babies.  That’s a lot of baby quilts each year, so volunteers coordinate specific quilts. I always love making a block or two to contribute to a quilt, but this past fall I changed it up a bit by volunteering to coordinate a quilt for a little boy, which is exciting for me since I normally sew for girls. 

The mom-to-be gave me some specific ideas for color palettes and quilt design (she really likes Denyse Schmidt’s Hop Skip Jump pattern) which was so helpful since I was a little bit nervous about the responsibility of coordinating the quilt.

IMG_8205-001

I tried a new quilting design from one of Angela Walters’ books in the center orange portion of the quilt.  Then I did my old stand-by of teardrops in the blue section.

IMG_8216-001

After assembling the baby’s quilt, there were quite a few very usable strips of fabric left over, and I hated to waste them, so big brother (he’s two years old) got his own quilt too!  I think I enjoyed putting this quilt together even more.  Picking out solid fabric from my stash for the block backgrounds was my favorite part, along with figuring out how to make enough strips out of the leftovers once I’d used them up and still needed a few.  A couple of strips have orange and blue in them for that reason, but I think the mismatched strips add to the playfulness of the design!

IMG_8241-001

This bigger quilt I stippled…I love the quickness and texture it gives a quilt.   Normally I go with one fabric for binding, but this quilt specifically asked for a scrappy binding and I was happy to oblige.

IMG_8253-001

Both quilts were well received and I’ve already seen a few photos of them in use on Instagram, the best kind of thank you

Wednesday, November 26, 2014

Dottie Dresden {a finished quilt}

IMG_7823

In the beginning of November, Rachel of Stitched in Color announced a scrap challenge from one of her sponsors, Lark Cottons.  The fabric was a sweet fat eighth bundle of polka dot fabrics.  The only rules were the project had to be finished by November 30 and you had to use all the fabrics in the bundle (you could add your own fabric). 

I wrote a tutorial detailing how I made the dresdens.  The blocks each measured 15” unfinished.  Then I decided to sew up the rest of the scraps to make wonky sashing to go between the blocks.  That’s my favorite part of the quilt!  I tried a new fmq design called “Ribbon Candy” by Angela Walters and it is magical!  It was easy to do and looks so good.  The light was coming into my sewing room so brightly and just illuminated the stitching in this photo.

photo (7)

Deciding how to quilt everything was the hardest part, because I still always want to just stipple everything and not try a lot of new things.  But I really went out of control on this quilt.  I used Aurifil cone thread in Dove.  Love!!!

IMG_7830

I stitched flowers in the center of each plate, several sections of pebbles, and some teardrop shapes.  Then I tried to make scales in the negative space.  I’m not sure if I like how the scales turned out, but overall I’m happy with the texture of the quilt.  It is surprising that the quilt is not stiff at all, but still nice and soft.  I haven’t washed it yet, but I bet it will be even softer!

IMG_7826

The back of the quilt is one of the bird prints from Heather Bailey’s line Up Parasol.  The fabric reminds me so much of our cockatiel, so of course I had to use it for something!  The binding is an unidentified light solid pink fabric I found in my stash. 

IMG_7844

I had a slight problem putting the binding on the quilt…I couldn’t find my Clover Wonder Clips anywhere!  Finally I remembered they were in a tote bag.  We were asked to share fun quilting gadgets at the last guild meeting and I never emptied out the bag.  After I found the Wonder Clips, binding was a breeze!

photo (6)

I’ve been using the Wonder Clips for over a year, but just a few weeks ago I figured out that I could clip the mitered corner and sew a continuous line all around the binding without backstitching and stopping at each corner.  Duh!

photo (7)

Tada!  A pretty good looking corner!

photo (2)

The finished quilt is 30” x 30”.  Originally I was going to use this quilt as a wall-hanging, but now I can’t make a decision.  It’s so soft and has a lot of fun fabrics, so I think it might make a nice baby quilt. 

IMG_7834

Thanks for visiting and I hope everyone has a wonderful Thanksgiving with family and friends!

Friday, July 25, 2014

Churn Dash Cosmonaut {a finished quilt}

Here are the final photos of my Modern Quilt Guild Michael Miller Challenge quilt.

067

The pattern is called “Unchurned” and comes from the book “Accentuate the Negative” by Trisch Price.  I followed the dimensions for the quilt but made the corner pieces 4 inches bigger than necessary and cut them wonky, but maybe not wonky enough for it to really show.

121

I tried to include selvages from every fabric used in the quilt.

025

There are many pieces that read Michael Miller or are the color dots from selvages. 

037

I thought it would be cool to include the color dots because really this quilt is about using all those colors—from new Michael Miller fabrics like Petal Pinwheels and Just My Type to mixing in Madrona Road and Whimsy Windows.  If the color worked, I tried to incorporate it in the quilt.

023

031

Using solids was also a goal for this quilt.  The solid dark gray is Michael Miller cotton couture in charcoal.  The coral is also Michael Miller.  The provenance of the green, grays, cream, and aqua is unknown.

097

The gray rectangles are quilted densely with back-and-forth lines. 

086

And each of the gray half-square triangles are quilted with big and small circles.  The top thread is dark gray and the bobbin thread is light aqua.  Getting the tension right took a lot of practice, but overall the stitching is really good.

096

The rest of the quilt is stippled densely with aqua thread on top and bottom. 

102

The different quilting styles give the quilt a nice texture that is not stiff at all.

I tried to get creative with some of the piecing.  This flower is pieced from yellow and blue fabrics.

091

There are several fussy cut cats.

111

And one bird.

087

A fun little curved piece.

112

A pretty yellow flower.

109

And some flying geese.

 128

The back has a pieced section…and quite a few puckers.  It was a major disappointment on my end.  I made the mistake of quilting the solid sections before the center section, and ended up with too much backing fabric in the center.  The good news is this quilt is going to hang in my living room, so no one will be the wiser, and it’s a lesson learned to always quilt from the center out.

162

The quilting on the back through these flowers is my favorite part of the quilt.

144

This quilt is entitled “Churn Dash Cosmonaut” for the fact that it’s a micro and macro view of a churn dash and the cat fabric is called “Atomic Tabbies.”  The song “Low” by Cracker may have had something to do with it too…

155

The finished size is 72” square.  I’ll be linking up to Crazy Mom Quilts and Fort Worth Fabric Studio.

085

Thursday, July 24, 2014

MQG Michael Miller Challenge

001

Finally finished up my quilt for the challenge today…whew!  It was a whirlwind of sewing and I’m hoping to get some good photos of the quilt tomorrow.  Unfortunately the rain kept me from getting any today.  So in lieu of good photos, I thought I’d share a few process photos from along the way.

It all started with putting up a temporary design wall.  I marked out the sections and sizes with painter’s tape so I had a good idea of the spaces I needed to fill with patchwork.  Immediately my human helpers started using the wall for their very own projects.

photo

I really wanted to use some text fabric in the quilt.  The rules state you can use any kind of Michael Miller fabric, so I dug out some Madrona Road from last year’s challenge and decided it added just the right dark depth to the Petal Pinwheel collection for this year’s challenge.  Then I had what I thought was a brilliant idea.

photo

Why not use some “text” fabric in the form of selvages?  I’d never sewn with them before, but it couldn’t be that hard, right?

photo

The pieces were teeny tiny, plus keeping the letters lined up was easier said than done.  But overall, the effect is what I was going for.  My husband had the piggy-back brilliant idea of putting a huge strip of “Michael Miller” across the quilt.  I was digging through my stash trying to come up with enough pieces, but I settled for this strip, about 12 inches long in the finished quilt.  Unfortunately, a few inches of the original strip had to be amputated while trying to fit together the center panel.

photo (1)

I tried to pay homage to all the designers of the fabric I used in the quilt.  Patty Young’s name got bisected, so one selvage reads “Young Michael” but I thought that was kind of funny and left it in.  You can see I gave Violet Craft a shout out this year.  Too bad I didn’t think of this last year…

I got pretty excited when the pieces started going together and I could get a feel for what the quilt was going to look like.  My daughter made me a cute “good luck” sign that she pinned to the design wall.  I wanted to make sure a few signature pieces were included in the quilt, like a bunch of wonky churn dashes.

photo

Then I wasn’t sure if I had enough recognizable “blocks” included in the quilt top, and I added flying geese even though they aren’t part of a churn dash.  I wanted the judges to see that I could piece points very accurately.  These babies are pointed (except the top point, which had to be sacrificed to make it fit).  There’s also an impromptu curved piece I made just winging it.  Just so they know I can actually sew…lol!

Then it was finally time to sew the nine patches together!  My trusty non-human helper inspected all the seams and fastidiously cleaned up any errant threads.  The bird fabric in this quilt reminds me of him, so this quilt is dedicated to him in thanks for all the quality control support he’s given me on this and many other projects.
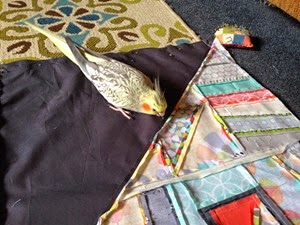
photo (1)

Yay!  The top was finally done and I could sit back and relax, maybe enjoy a celebratory glass of wine?  Uh oh, not so fast, this was Tuesday, and the quilt had to be finished by Friday…

photo (1)

I got the backing on the long arm.  The center strip of the backing is pieced with the label in another churn dash and the two fabrics other fabrics are Michael Miller Birds of a Feather “Tweet” and Atomic Tabbies.
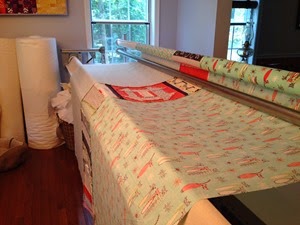
photo (2)

See, this quilt is dedicated to a cockatiel, but also to a cat.

photo (2)

The photo is a little fuzzy because it was taken around 6am this morning as she was helping me finish up the quilting.  She loves scraps almost as much as my children.

And that’s the end of the story.  Oh, and here’s the finished quilt right before it started raining again this afternoon.

photo (2)

Thanks for stopping by!

Tuesday, July 8, 2014

Quilting Fail? Part II {a finished quilt}

About a week ago I posted about a top for the scrap basket quilt along I wasn’t too happy with.  Here it is in all its glory:

photo

Things I didn’t like about this top:

  • no visible color scheme
  • too much red in three blocks clumped on left side
  • just way too much going on!
  • no opportunity to do any interesting quilting

Things I did like about this top:

  • it was made completely from 2.5 inch strippy scraps with not a lot of cutting necessary
  • the vibrancy of the dark and light colors together

I thought a lot about what I could do to improve this top and came up with this:

photo

I separated many of the rows from the original quilt top, moved around some blocks with red in them, and resewed together a chunk of 7 rows.  Then I added some negative space in the form of a solid gray border at the top and bottom.  Improvement?

The one thing that was nice about this new arrangement is that it allowed me a lot of blank space to try some different free motion quilting designs.

photo

I have been watching Angela Walters’ classes on Craftsy lately, so the large and small circles are taken exactly from her class.  It took so much thread to do this design that I had to skip it for the bottom of the quilt or I might not have enough gray thread for my MQG challenge due later this month.

photo (1)

These concentric squares were also part of the Angela Walters class.  I have learned so much from her class and her positive attitude encouraged me to just go for it and try something new.  She was right, even with mistakes and not-so-perfect or straight stitching, the designs still look pretty good.

photo (1)

Angela suggests using thread that blends when you’re first starting out, but I had this black sheet I’d always intended to use for another quilt but never had.  Also I had this crazy idea that it would be fun to see exactly what the stitching looks like. 

photo (2)

If you squint and don’t look too closely, it looks pretty cool!

photo (1)

The binding is also something from my stash, a pearl bracelet fabric in metallic gray.

photo (2)

The finished size is 53.5” x 66.5”.  It’s ready to be mailed to Margaret’s Hope Chest.

Many thanks to Amanda Jean for organizing another quilt along!  I joined her last one 4 years ago and never finished the quilt.  That was before I could sew a consistent 1/4 inch seam allowance without tears, so maybe I should dig out that WIP and finish it up too?

I’ll be linking up to Fort Worth Fabric Studio and Crazy Mom Quilts later this week.