
 They didn't take long to make at all and you can just use scraps if you're like me and have quite a few oranges, yellows, and greens in your basket. All of the Halloween prints are leftovers from Halloween trick-or-treat bags I made for my daughters and their friends.
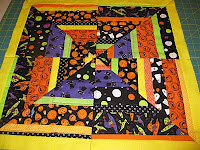
Finished size: 19"x19"
Supplies:
- the equivalent of 8 jelly roll strips of various Halloweeny fabric (I used all kinds of scraps and cut them all 11 inches long with different widths from about 1 1/4 to 2 1/2 to accomodate some of the bigger Halloween prints) You can double the amount to 16 jelly roll strips to make two table toppers.
- 2/3 yard for backing Or you could make a scrappy backing.
- 1/4 yard for binding
Steps:
1. Make 4 (or 8) blocks from your strips that measure about 11 x 11". Press all the seams in one direction.


2. Cut the blocks down to 9 1/2 x 9 1/2 inches square.

3. Cut the blocks from corner to corner on the diagonal to make two triangles.

4. Decide on a design layout with your triangles--I'm not so proficient here, but I think you could make pinwheels or diamonds or whatever shape. I arranged mine to look kind of spider-webby.

5. Join two blocks together and then the remaining two blocks together. Press the seam allowances so that they lie in opposite directions when joining the two halves.
6. Sew the two halves of the table topper together. The center will be thick from all the seam allowances. In order to get my sewing machine through the thickness, I trim out as much seam allowance as I can. Then, when I start sewing, instead of starting at one end of the seam and sewing to the end, I start directly in the middle where the points all meet so I can make sure that the perpendicular seam lines up perfectly. Then I sew from the middle to the other end.
7. Then I sewed on a 1 1/2 inch yellow border. I chose a fabric that wasn't part of the blocks to try to really make the center pop out. You can't really tell from the photo, but the yellow isn't solid--it has some white pindots. My husband said the topper is "trippy."

At this point, once all the borders are on and trimmed/squared, in order to make everything super flat and ready to quilt, I turn on the steam on my iron and press to my heart's content.
8. Layer the batting and backing and quilt as desired. I did two different quilting designs. The first table topper I quilted with straight lines, using painter's tape as a guide. The second table topper I quilted in the ditch when each triangle is joined to the next. Then, I quilted concentric squares which gives the back a kind of spider web design. The second design is my fave. I used painter's tape to make this design, too. I really like painter's tape...if you ever accidentally quilt through it, the perforations from the needle make it a snap to rip off anyway. A great way to sew a straight line or design.


 And once you bind it, voila! you're finished and have something great to brighten up a table for Halloween. This is my first tutorial, so feel free to email me any questions.
Love your table topper! Your directions and photos make this look easy enough for me to follow along with no problems! Thanks for taking the time to post.
ReplyDeleteThese are so cute!!
ReplyDelete