Showing posts with label Halloween table topper. Show all posts

Tuesday, October 18, 2011

Swaps Goodies

Today I got my fall swap package in the mail.  I sent my partner, Kim, this fall table runner, some Halloween candy, and a wristlet key fob I made.

 oc pictures 1844

The leaf fabric has a linen look I really like.

oc pictures 1821

Today the mail lady Donna drove up our road and delivered these goodies Esther is modeling in the photo…a cute pumpkin bag, a tabletopper, a Halloween mug rug and new mug, and candy.  You can’t see the chocolate pretzels because Esther has already eaten them all! 

oc pictures 1930

Thank you, Kim!  Everything is lovely!

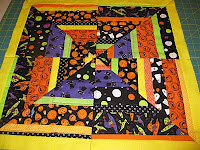
I also mailed out my block for my Block Swap Adventure partner Linda yesterday.  I never took a photo of the complete block, but here is the sneak peek.  She asked for bright colors.

oc pictures 1885

I really wish I had taken a photo of the whole block.  It is by far the best one I’ve made for BSA and I think it turned out really nicely.  My points were all in the right place and not cut off for once!

Here are the three blocks I’ve received so far along with two I made myself. 

oc pictures 1886

I plan to make a quilt for my brother-in-law in civil war repro type fabric once I amass enough blocks.

Sunday, October 17, 2010

Halloween Table Topper Part II


Last night I finished binding the two table toppers and I think they turned out pretty splendid (at least my 4 year old thinks so). I let her choose which one to keep and which one to give away, so we are keeping the one with the "spider web" design on the back. It looks nice in our living room:
The binding is completely machine attached. I have been honing my machine binding skills lately and I think I'm getting pretty good at it. It just takes a little patience and a lot of pinning. I entered a couple quilts in the county fair recently (third was my highest placing), and on one table runner the judge wrote "interesting binding" as a comment on the back of my card. Not sure what he/she meant by that. Interesting=good or Interesting=do it by hand next time. I gotta tell you, though, I don't think I will ever hand sew binding on anything ever, ever, ever again in my life. I just don't have it in me. The only think I'll ever hand sew will be hems that need to be repaired, and if I ever learn how to use my serger, I might never have to hand sew in my life again!
Stay tuned as I share some easy Halloween crafts you can do with your kids. Not all of them involve sewing, but they are guaranteed to be fun! Also, coming up will be a countdown to Christmas with great homemade gift ideas for kids that you can make either with or for a child.

Wednesday, October 13, 2010

Halloween Table Topper

We are going to my sister-in-law's sister's house for a Halloween party. This is an impressive party--lots of kids and tons of creative food and decorations. Since I am huge already (8 months pregnant), I volunteered to bring apple cider with mulling spices (not a lot of cooking involved), I thought I'd make something for Debbie's dining room table. Her table is average size and round, so a table topper would be a much better choice than a table runner. I get up about 2 hours before my family every morning so I have some time to myself and to work on my crafts. I whipped up these two table toppers (I haven't binded them yet) between my morning (deciding on a design and cutting) and my husband taking the kids to the local pond and giving them their bath tonight (making the blocks and quilting):

They didn't take long to make at all and you can just use scraps if you're like me and have quite a few oranges, yellows, and greens in your basket. All of the Halloween prints are leftovers from Halloween trick-or-treat bags I made for my daughters and their friends.

Finished size: 19"x19"
Supplies:

  • the equivalent of 8 jelly roll strips of various Halloweeny fabric (I used all kinds of scraps and cut them all 11 inches long with different widths from about 1 1/4 to 2 1/2 to accomodate some of the bigger Halloween prints) You can double the amount to 16 jelly roll strips to make two table toppers.
  • 2/3 yard for backing Or you could make a scrappy backing.
  • 1/4 yard for binding

Steps:

1. Make 4 (or 8) blocks from your strips that measure about 11 x 11". Press all the seams in one direction.

2. Cut the blocks down to 9 1/2 x 9 1/2 inches square.


3. Cut the blocks from corner to corner on the diagonal to make two triangles.


4. Decide on a design layout with your triangles--I'm not so proficient here, but I think you could make pinwheels or diamonds or whatever shape. I arranged mine to look kind of spider-webby.

5. Join two blocks together and then the remaining two blocks together. Press the seam allowances so that they lie in opposite directions when joining the two halves.

6. Sew the two halves of the table topper together. The center will be thick from all the seam allowances. In order to get my sewing machine through the thickness, I trim out as much seam allowance as I can. Then, when I start sewing, instead of starting at one end of the seam and sewing to the end, I start directly in the middle where the points all meet so I can make sure that the perpendicular seam lines up perfectly. Then I sew from the middle to the other end.

7. Then I sewed on a 1 1/2 inch yellow border. I chose a fabric that wasn't part of the blocks to try to really make the center pop out. You can't really tell from the photo, but the yellow isn't solid--it has some white pindots. My husband said the topper is "trippy."

At this point, once all the borders are on and trimmed/squared, in order to make everything super flat and ready to quilt, I turn on the steam on my iron and press to my heart's content.

8. Layer the batting and backing and quilt as desired. I did two different quilting designs. The first table topper I quilted with straight lines, using painter's tape as a guide. The second table topper I quilted in the ditch when each triangle is joined to the next. Then, I quilted concentric squares which gives the back a kind of spider web design. The second design is my fave. I used painter's tape to make this design, too. I really like painter's tape...if you ever accidentally quilt through it, the perforations from the needle make it a snap to rip off anyway. A great way to sew a straight line or design.

And once you bind it, voila! you're finished and have something great to brighten up a table for Halloween. This is my first tutorial, so feel free to email me any questions.