Showing posts with label machine binding. Show all posts

Sunday, February 9, 2014

Meet Mr. Fox {the pillow}

 1-IMG_4797

A few weeks ago I cut into some fat quarters of fox fabric designed by Andie Hanna to make a quilt.  Plans changed, and I decided not to use the foxes in the quilt, so they went in this pillow instead.

The gray and light blue patchwork were also left over the from the quilt because the vibrancy of the rest of the blocks drowned out the low volume patchwork.

1-IMG_4784

The binding is a brown Stella dot and the backing is some striped fabric left over from another quilt.  It’s called Soul Garden by Carolyn Gavin.

1-IMG_4793

I quilted the front of the pillow on my long arm, swirls for the first time.  Definitely improved with practice!  The finished pillow is 19 x 19 but I was able to stuff a 20 x 20 pillow insert in there (the only size I had on hand).  Makes it nice and puffy I think!

1-IMG_4758

I’ll be linking up to Fort Worth Fabric Studio and Crazy Mom Quilts this Friday.  Have a great week!

Thursday, May 16, 2013

Strawberries in season

1-IMG_0669

Local strawberries just appeared at the farmer’s markets in our region and they inspired me to make a little mat for our dining room table.

1-IMG_0631

I just cut 2.5” squares from an assortment of “strawberry” fabric and some of that sweet birdie fabric from these baby shoes.

1-IMG_0640

These mats make great protectors for your dining room table.  You can put warm dishes on the table without the fear of ruining your tabletop.  I like tablerunners, too, but this size is much more practical for our table.  It finishes about 11” x 19”.

1-IMG_0654

The back is this sweet apple and cherry print, so it can be reversible.  The binding is machine attached, which hopefully will give it a little more durability since I figure it will be washed a lot.

1-IMG_0665

I wish I could have taken a photo with a bowl of fresh strawberries on top, but every time I’ve bought strawberries they are gone within the day—not enough time for me to snap a photo.

Have a wonderful day!

Thursday, February 7, 2013

Pave The Way…for another finish!

1-IMG_0831

A few days ago I finished up a quilt I started almost two years ago, which feels great. I cut all the pieces for the quilt and then promptly put them in a Ziploc bag never to be touched again until a week ago.  The pattern is called “Pave the Way” by Karen Gray and was featured in the Quilt Sampler magazine from Spring/Summer of 2011.  It was fun, easy, and fast to put together.

 1-IMG_0833

The background solid is Kona sand and I stippled in cream thread.  The finished size is 50” x 66.5”.  The fabric I used is designed by Carolyn Gavin and called “Soul Garden.”

IMG_0713

I love the pretty butterflies! 

1-IMG_0871

The backing is a pretty floral print from the collection.  I used a green pindot from my stash for the binding.

1-IMG_0880

My cousin who just had a baby last month was admiring the quilt top a few days ago, so I knew just who to give it to and it gave me the extra motivation to get it finished.  It’s perfect for mom and baby to snuggle under!

Up next, finish up the Valentine’s pillows I started last month.  I am linking up to “A Lovely Year of Finishes.”

Monday, January 7, 2013

A Lovely Year of Finishes

I am linking up the first of my Just Three goals to the Flickr group “A Lovely Year of Finishes.”  I just finished sewing the binding on this morning and am picking up my oldest from school a little early to head to the park for a photo shoot this afternoon (don’t tell her teacher!).

I thought I’d show a few photos of my machine binding process. The first few I bound by machine didn’t come out perfect, but just like with fmq, my machine binding skills get better and better with practice.

1-IMG_0457

I start by just stitching all the way around the perimeter of the quilt about 1/8 from the edge.  It is important to do this while your extra batting and batting are still intact!!!!!!!!  If you try to stitch after you’ve cut it off, you’ll get all kinds of puckers and pulls.  I learned this the hard way.

1-IMG_0463

This little one helped with the binding process.  Just so you know, I cut my binding 2.75” wide.  I can’t seem to get things to line up properly when it’s 2.5”.
1-IMG_0466

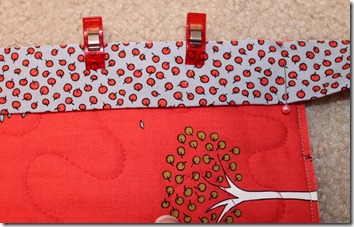
Love those Wonder Clips!  I like to just clip the binding onto the back and then mark my 1/4 inch stopping point with a straight pin.  I just sew right up to it and then backstitch.

1-IMG_0471

Here’s what the back looks like after I use a zig-zag stitch to attach the binding on the front. 

1-IMG_0473

The zig-zag stitch is nearly perfectly straight along the edge of the binding.  I find that as long as I don’t stop and start stitching too much or pull on the binding as I wrap it over, the stitches don’t arc.
1-IMG_0477

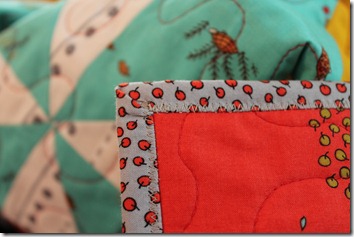
Here’s what a corner looks like. These stitches are not coming out in the wash!

1-IMG_0489

My first finish of 2013 is this quilt I designed for a Quilt Along that will start later this month.  It’s called “Easy as Pie” and the name says it all!  The pattern uses exactly every piece of a layer cake, has relatively little cutting, and comes together fast!

Wednesday, July 11, 2012

Bea’s first quilt

It’s finished!  Bea sewed all the squares in rows and sewed all the rows together.  Then she tied all the floss at each block intersection.  I sewed on the binding.   It measures 38” x 46”.   The fabrics are all from Joann’s, has no batting, is backed with soft pink flannel, and is bound with pink and white striped fabric from Connecting Threads.

005

We had a little trouble getting a good shot because “someone” was being very helpful by playing peek-a-boo.

004

Bea created this tiny label that I sewed to the front  bottom corner of the quilt.

007

It’s  says:

To Ron

From Bea

July 2012

and is very decorated and written with fancy letters. 

I foresee a lot of quilts in Bea’s future!

Linking up to WIP Wednesday.

Friday, April 20, 2012

This week’s finishes

020

I have two finishes for this week.  I finally put the binding on this quilt and blogged about it here.

015

And then I made a special little fishy mat for my daughters’ room.  They have an ant farm (which has lasted much, much longer than the 5-6 weeks as stipulated in the directions—more like 4 months now).  The deal was they could get a betta for their room after all the ants died.  It looks like that is never going to happen, so we went ahead with our fish plans.  (ps.  If you ever get an ant farm and the ants happen to be harvester ants which can bite/sting, tell your babysitter NOT to let the kids go to their room without supervision.)

025

I used just various fabrics from my stash.  The solids are quilter’s linen (not really linen) by Robert Kaufman.  I got a rainbow of colors from Fabric.com a few weeks ago and have been trying them out.   I didn’t measure it, but the finished dimensions are about a foot square.

026

I fmqed all over (because I still have not bought a new walking foot) and binded and backed it with el cheapo fabric from Joanns that I bought when I was first starting out sewing.  The quilting is done in light pink thread, but it pretty much just looks white against the top fabrics.  My oldest daughter wanted to know what all those squiggles are supposed to be.  She thinks they look kind of like coral, so I told her that’s what I was aiming for…lol!

We got a new fish on Wednesday, dubbed him “Feather Fin,” and he is doing well, enjoying his much more spacious home.

I am linking up to Crazy Mom Quilts today.

Tuesday, April 17, 2012

Flora Charm Quilt

015

Last week I finally put the binding on this quilt made with Lauren and Jessi Jung’s Flora.  I used two charm packs I bought at the LQS and supplemented what I needed with solids from my stash and the border fabric purchased at Hancock’s of Paducah during an online sale.   The finished size is 61 x 77 and the pattern came from the book Simply Charming by Moose on the Porch Quilts.  It is one of the first books I bought and think it’s so great for a beginner.  I’ve made 3 of the patterns in the book since I first started quilting.

020

I had a little trouble deciding on the binding.  The fabric I purchased online looked more greenish than yellow, and I wasn’t happy with the look.  So, I put the quilt in a pile in my sewing room for a week or two while I decided what to do.  I almost purchased the green lattice print from this collection since I have a thing for striped binding and the lattice is the closest thing to stripes in Flora (there are no polka dots either).  But my practical side won out and I ended up binding it with leftover fabric from the border.  I like!!!  And it was free!  The backing is a striped sheet from Target. 

022

My fmq is getting a lot better, and I completely machine-bound this quilt using Kaelin’s machine binding tutorial.  I have done it a couple of times, but this is the first time it’s turned out nearly perfect.  It literally took about an hour to make and attach all the binding.  How cool is that???

023

I really love Lauren and Jessi’s style and color choices.  I have a massive cache of “Hideaway” and I can’t wait until their new line “Birds and Berries” comes out.  Here is a preview courtesy of the Fat Quarter Shop.

Birds & Berries Yardage Lauren & Jessi Jung for Moda Fabrics

I love how the colors are similar to the other collections, but I really am excited about the purple added to the mix.

I am linking up to Quilt Story today.