Showing posts with label linen. Show all posts

Wednesday, September 10, 2014

Great Granny! {a finished tablerunner}

Isn’t she a beauty?

034

The original pattern from Lori Holt’s book called for 3 x 6 great granny squares, but I modified the design to fit the top of our bedroom dresser so this one has 2 x 7 blocks.

053

I am loving the texture of the free motion quilting.  By golly, I think I’m finally getting it!  Something just clicked in my brain this time as I was trying to freehand draw the design on paper before attempting it with my machine. 

065

The back is nearly as gorgeous as the front.  I was able to use this remnant of Anna Maria Horner fabric left over from another project and there was just enough to position the large floral motifs straight down the center of the back.

The finished size is 17.5 x 51.5.  Most of the blocks were designed by my two oldest daughters.  I’m pretty sure I only had to show them how to arrange it once and they were on a roll putting them together for me.  The background is Essex linen in a cream shade.

048

I used a lot of scraps for this project, so this will be labeled #2/52 for a little scrap project goal I am challenging myself to complete a la Crazy Mom Quilts and her 100 scrap projects goal.  I might be crazy, I am a mom, and I quilt, but there’s no way I could do 100 scrap projects like she’s breezing through them!  So 52 is my goal.

038

It feels great to have that old bath towel replaced by this tablerunner on our bedroom dresser! 

Thanks for visiting!

Friday, March 21, 2014

The Big Pantone Reveal! (hint: it’s a pillow)

Have you ever participated in the Pantone online quilting challenge?  Two years ago I decided to delve right in and created this beauty for Tango Tangerine.  It was my first online competition and so much fun!

026

It hung in my sewing room until my daughter recently took it for her room.  That’s what I call a  happy ending for a project.

Then last year the color was emerald so I came up with this quilt, which qualified for the finished tops category, and it hasn’t moved past that stage.   I’m sad to say that this 2013’s project outcome isn’t as happy as 2012’s. Destined to be a WIP forever???

1-IMG_9229

But, on the bright side, I was able to make this table runner and enter two categories! 

1-IMG_1020

It was hard to part with, but I sent it to my sister for her table.

Do you know this year’s Pantone Color?  Radiant Orchid!!!  A beautiful shade of purple which just happens to be my favorite color ever! 

I entered two projects for this contest.  First up is a baby quilt that qualifies for the Finished Quilts Category.  This quilt measures 42” x 42” and is made with mostly stash fabrics (I had to purchase the binding online).  It was fun to make and I liked pairing up the yellow and gray with shades of purple, from orchid to plum.
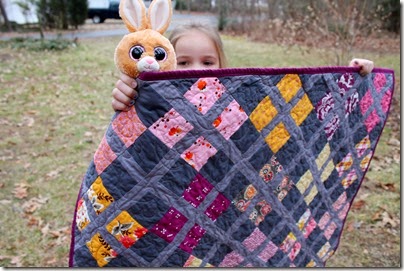
1-IMG_4839

The blocks are made with some awesome fabrics by Thomas Knauer, Joel Dewberry, Denyse Schmidt, and Anna Maria Horner to name a few.   And there’s even fabric designed by DC Modern Quilt Guild’s own Jessie Aller for In the Beginning Fabrics--two prints from her line Jasmine Tea.
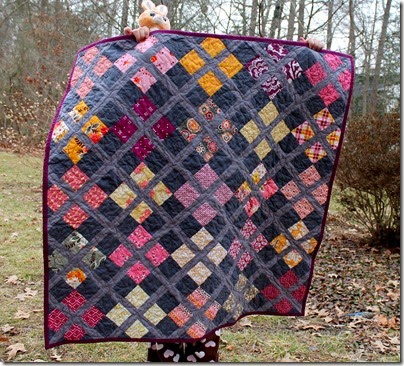
1-IMG_4820

You can see there’s a nice selection of various plums, orchids, magenta, and fuchsia colors.  I just love this quilt!  I made another larger version of this design and tweaked some of the construction in a quilt called Dreamcatcher. 
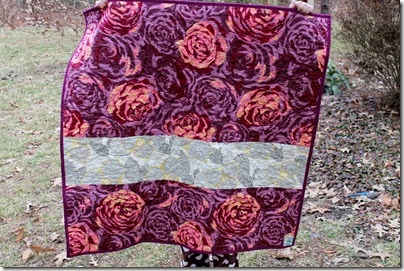
1-IMG_4834

The back has a nice large scale print by AMH with plum, orchid, and a peachy shade bisected by a gray, yellow, and white Amy Butler print.  I think all the colors on the back nicely mimic the colors on the front but do it in “large scale style,” which can be more appropriate on a back.

And then, I have one more project to share for this year’s competition.  I really held nothing back on this last project.  First off, it’s a Jen Kingwell pattern, which means it is completely amazing!  It took me a long time to piece this baby together.  I used a combination of hand and machine piecing.  Did I mention it has curves?  That I picked nearly every single curve and sewed them all at least two times?  And a lot of hand quilting?  Okay, time for the big reveal…

1-IMG_6254

The pillow measures 19” x 25” as per the pattern, which should fit a standard size pillow case plumply.  I used some stash fabrics for the hearts and letters, plus quite a few new purchases of fabric including Safari Moon, True Colors, the backing print by Joel Dewberry, and the Couture Orchid fabric by Michael Miller for the binding.

1-IMG_6277

I am thrilled to pieces with how this pillow turned out.  The hearts look like hearts.  The seams aren’t perfect, but good enough for me! 

1-IMG_6202

I used perle thread to outline the hearts and letters, but decided the linen background needed something more, so I used some thicker 12 wt Aurifil threads in pinks and purples to add a pop of color. 

1-IMG_6162

I quilted tiny v stitches all around the “love” section of the pillow to bring more attention to that section.  After a while it became apparent that the v’s look like little hearts.  Yay!  Just the perfect embellishment! 

1-IMG_6210

Always, with the very few things I’ve hand quilted, I only quilt through the top and batting, then add the back later and machine quilt in the ditch to secure the layers together.  I used Aurifil #2324 which matches the Essex linen in natural perfectly.

1-IMG_6265

It did take someone who machine sews everything (including binding) many, many movies to do all the hand stitching on this pillow.  But every few minutes as I could see progress, I was motivated to just keep stitching and before I knew it, the pillow front was done.  And I think my husband kind of liked my company while we watched a few movies I would have otherwise skipped if I wasn’t hand sewing.

1-IMG_6267

A piece of muslin was added to the back of the pillow front and I stitched in the ditch around a few sections.  Then I did one outline around the perimeter and was ready to add on the envelope back pieces and binding.

1-IMG_6273

The binding is machine attached to the back then brought over to the front and elegantly zig-zagged down.

1-IMG_6245

This sweet pillow is destined for my daughter’s room as soon as I get that thing painted.  New bunk beds have been sitting in boxes in our garage since January, but I haven’t had a chance to prep the room yet.  Soon, I promise, this pillow will find it’s new home.

1-IMG_6192

Thanks for reading this long post!  Go check out all the other entries at On the Windy Side if you want to get your purple fix for the day and see all the gorgeous entries.

Linking up to Fort Worth Fabric Studio today.

Thursday, March 13, 2014

Linen + Shamrock Table Runner {a tutorial}

1-IMG_6064

You will need:

  • green scraps to make shamrocks
  • 1/4 yard linen
  • 1/4 yard background fabric preferably linen
  • 1/2 yard backing
  • batting scrap at least 11” x 30”
  • fusible web of your choice (I used Lite Steam a Seam 2)

Use a 1/4” seam unless noted.

1.  Download & print the template for the shamrock.  Lindsey Weight of the Fort Worth Fabric Studio blog kindly let me borrow the link.  You will need the smaller template for the table runner.

2.  Trace the template 5 times on fusible web.  Following manufacturer’s directions iron the web to the wrong side of your green scraps.  Cut very carefully around the shapes you traced.

3.  Cut five 5.5” squares from your linen.  Peel off the paper from the back of your shamrocks and arrange them on the squares how you like.  Press them to bond into place on the linen.

4.  Set your stitch length a little longer than the normal 2.5 for piecing.  I set my machine to 3.0.  Straight stitch close to the edge of the shamrocks to permanently stitch on the linen.

5.  Cut five 2” x 5.5” and five 3” x 5.5” rectangles of background fabric.  Arrange your 5.5” squares in a row how you like them.  I alternated the shamrock orientation.  Sew the rectangles onto the top and bottom of your 5.5” squares so that the squares appear to move up and down.

1-IMG_5961

6.  Press all your seams open and you can use some light starch or Magic Sizing to help set those seams open.  I found that the linen seams didn’t stay perfectly flat without a little spritz of Magic Sizing.

1-IMG_5968

7.  Sew your blocks together and press those seams open.  Add a 2” x 9.5” strip to each end of your runner.  Press those seams open, too.

1-IMG_5972

8.  Press your runner really flat.  Now baste it however you prefer to your piece of batting.  I used a little bit of spray adhesive or you could use safety pins. 

9.  I hand quilted big stitches around the perimeter of the center section.  One nice thing about this runner is you don’t need to bury your threads because you are quilting through the top and batting only.

10.  Once your runner is all quilted, square up your runner & batting to approximately 9.5” x 28.5”.  Place right side down on the right side of your backing.

1-IMG_6037

11.  Using straight pins, pin the top/batting to the backing all the way around the perimeter.  Then I used a long ruler and rotary cutter to trim off the excess backing.

12.  Using a walking foot, sew a 3/8” seam around the edge leaving a 2.5” opening for turning your runner.  Clip off the corners making sure not to cut through your stitch line.

1-IMG_6044

13.  Turn right side out.  I used a chopstick to push out the corners of the runner.  Press the opening closed as perfectly as possible so you can’t even tell there’s an opening.  Press the entire runner as flat as possible.

1-IMG_6046

14.  Using the walking foot, sew a 1/8” to 1/4” seam around the edge of the runner. 

That’s it!  Sewing this runner took about 3 hours, including almost an hour to do the handstitching.   Happy St. Patrick’s Day!

Wednesday, March 12, 2014

Zakka Style Shamrock Table Runner {a finished project}

1-IMG_6069

Maybe it’s the warmer (finally!) weather or my love of the color green, but after making those Shamrock Pillows with the kids, I needed to sew something else green.  So, I fooled around with more applique, linen, and some hand stitching, and a Zakka Style Table Runner was born.

1-IMG_6065

I used green fabric from my stash, including Jennifer Paganelli, Connecting Threads, True Colors, and a mystery green of unknown origin.

1-IMG_6052

Does it look better with purple?

1-IMG_6064

Or green? 

1-IMG_6082

I like the simple look of the straight line stitching in natural colored thread on the applique and the gray perle thread outline on the linen.  What do you think the frog in the photo above is thinking?

I stitched only through the batting, with no backing, so the back is simply a piece of linen with edgestitching.  I went back and forth about using quilting weight cotton for the back and putting on binding, but I think the plain linen without binding is the perfect compliment to the front.

1-IMG_6077

I used a 1/4” walking foot to do the edgestitching and it turned out very nice and even.  The finished size is 9.5” x 28.5”.

1-IMG_6081

Originally these shamrock squares were going to be a pillow.  So I had a few squares left over.  I already gave away the finished runner, so this new one will be for our table.

1-IMG_6089

These shamrocks better bring us some luck for spring weather.  Snow is in the forecast again!

Linking up to WIP Wednesday and Fort Worth Fabric Studio.

Monday, March 10, 2014

Spring Pillows and New Shoes

Over the weekend we finished up another Shamrock Pillow. 

1-IMG_5987

One of the pillows is for us, and the other we gave to my great aunt this morning along with the yellow flower and caramels as an early St. Patrick’s Day gift.  My great aunt happens to be very Irish and proud of it, so she loved the pillow!

1-IMG_5989

If you want to make your own, you can get the template from the Fort Worth Fabric Blog and resize the larger shamrock to 200%.  We appliqued it to a 12.5” block and added 2.25” borders around, so the cover fit a 16” pillow form perfectly.  The envelope back was made with two 16” x 20” panels hemmed on one edge by folding the fabric back about .5” twice.

Esther picked this nice springy fabric for the back.  It’s the perfect compliment to the linen on the front.  Now I just wish the weather would feel like spring already!

1-IMG_5991

I was so enamored of these pillows that I had to start another project with them.  Here’s a little sneak peek. 

1-IMG_6001

Miraculously I got all the hand stitching done in the waiting room at gymnastics this morning so as soon as the rain stops and the sun comes out I hope to get some photos of it finished.

1-IMG_6005

Over the weekend we planted some lettuces and strawberries in repurposed containers and put them on this cool A-Frame plant stand I bought on clearance at an online shop called Gardener’s Supply Company. 

1-IMG_6004

I was actually on there ordering the most awesome wellies for myself for the spring.  I’ve never owned a pair of rubber boots, but my kids always wear them in the spring and summer, so I thought I’d treat myself to a pair.  The nice thing is I won’t outgrow these and need a new pair every year!

1-IMG_6012

No, I don’t have backyard chickens, but I wish I did!  I got my mom a pair for Mother’s Day because she does have chickens.  Don’t worry, she doesn’t read my blog, so no spoiler alert.

And while I’m on the topic of shoes, I also got a pair of custom painted Tom’s for the summer from Anna See.  She has an online store and I happened to see these shoes while I was buying some bird prints for our bedroom when we were redecorating.  I never buy shoes full price or probably more than $15 a pair, but these were too amazing to pass up.

1-IMG_6030

She custom painted peacock feathers on them.  It took a few weeks for her to make them, but it was well worth the wait!  I’ve been rocking them all over town the past few days and I have to say, Toms are some comfortable shoes. 

Hope you are having a good start to the week!

Tuesday, May 28, 2013

Festival of Strings Part I

Rachel at Stitched in Color is hosting a string challenge.  When I saw the original post and the rule that strings had to be 3” or narrower, I knew exactly what I would make.

1-IMG_1055

These are leftover strips from a quilt I made from a 1/2 yard bundle of Indian Summer.  I had a few inches of each print left over from another quilt I made, so I cut the pieces into 3” strips and used my design wall to try to balance out all the prints in a somewhat improv kind of manner. 

1-IMG_1057

I used Kona Essex linen in natural for the background.  As an aside—the Kona linen in natural is a slightly lighter color than the wide Kona linen in natural, but just a tiny bit.  You might be able to tell in my photo that some of the linen looks a shade lighter than the rest.  I ran out of linen about halfway through the quilt and ordered the wide since it was only a dollar more than regular width.

1-IMG_1060

At first I didn’t want to repeat any of the strips, so I cut a few other prints from my stash, but I ended up repeating anyway.  This quilt is destined to be a gift for a birthday boy on June 15th, so it can’t languish for long!  I’m not sure what the exact size is, but definitely twin or larger.  It’s so big it doesn’t have enough room to hang down from the clothesline.  I’ve got the backing already made, just have to get it basted now.

I hope everyone had a wonderful, long weekend!

Wednesday, September 19, 2012

Baby Grace’s Quilt

 1-016

A friend just had a little girl last week. So I whipped up this quilt from the scraps left over from the hourglass quilt top I posted about here.

1-017

I used some leftovers to applique her name to the back.  Fun!

1-020

It was a miracle I found this backing fabric in my stash.  It is from a Connecting Threads collection called “A Sip of Summer.”  I told you I am loving orange lately.  The binding is Denyse Schmidt.  It measures 30.5” square.

1-021

I ran out of batting while making this little quilt, so I used a yard of white quilter’s flannel I had on hand from fabric.com.  I crossed my fingers when I put it in the wash because I was nervous everything might shrink badly (I don’t prewash anything anymore) but it turned out just right!  I love the soft feeling of the linen and hope baby Grace does too.

My next project will be for Grace’s big brother.   I just received all my Polaroids from the swap a few days ago and am putting them together in 12” blocks geared for boys.  Luckily I have about 200 Polaroids to choose from! 

032

Linking up to WIP Wednesday.