Showing posts with label scrap buster. Show all posts

Tuesday, February 17, 2015

Scrapbuster Modern Cross Pillow {a tutorial}

IMG_8380

I’ve been quite focused on using scraps and making pillows the past few months (just look at how many of my blog posts have been about pillows!).  I thought I’d share how I made the most recent pillows, which fit 18” pillow forms.

Supplies:

  • 45- 2.5” squares (rainbow, monochromatic, whatever you like!)
  • 4- 6.5” square solid squares (I used Kona silver)
  • 1 piece of muslin bigger than 18.5” square
  • 1 piece of batting bigger than 18.5” square
  • 2 backing panels measuring 12.5” x 18.5” if you want to do an envelope closure backing
  • 18” pillow form

Directions:

Decide what kind of color scheme you want to use, then lay out five 3 x 3 grids of 2.5” squares for each of the sections of the cross.

IMG_7967

Sew the squares together in rows.  You can nest your seams (alternate the direction you press them for each row) or press open.

IMG_7968

Sew the rows together.  Press to one side or open.

IMG_7970

Now lay out your pillow top.  Sew the sections together the same way.

IMG_7975

IMG_7979

Here are my two pillow tops waiting to be quilted.

photo 2

That’s all there is to making the pillow top!  Quilt as desired.

photo 1

Flowers and teardrops for the rainbow pillow.

IMG_8364

Ripple stipple for the purple pillow.

IMG_8359

Create an envelope back for the pillow with the two 12.5” x 18.5” backing panels or use an alternate method for making the back.

Bind or serge to finish.

I think this block would be awesome for a bee!  I might even have to make my own rainbow quilt. 

Thanks for stopping by!

Sunday, December 1, 2013

Strip of Scraps Dishtowel {tutorial}

2-IMG_2898

Looking for a fast, easy, and FUN (I promise!) project to make for gifts this holiday?  Look no further, as these embellished dishtowels take only minutes to make and pack a scrappy punch of fabric goodness that you can easily tailor to each recipient. 

I was inspired to make a dishtowel for my own home after seeing a similar craft project on Stitched in Color.  My daughter Bea and I dove right in to make our own.  We thought we’d share our tips for making these dishtowels.

2-IMG_2895

First we started by going to Kohls and picking out a pack of woven cotton dishtowels in appropriate fall colors (these were Thanksgiving gifts, but you can make them for any season or occasion).  The brand we purchased was “Bobby Flay” and they’ve been extensively tested in our kitchen and in our washing machine and dryer, and I have to say they get 10 stars.  I have tried other brands since, but Bobby Flay were the best overall even though the others were fine.  Just saying!  You’ll also need one roll of 1/4” fusible tape, sometimes called “hem” tape.

After picking a towel, open it up and determine which are the shorter sides of the rectangular shape.  You will probably want to affix your strip to one of the shorter sides, so measure the distance between the two edges.  Add 1/2” to this number and you will have the length of the scrap strip you will need to make.  I made my strips about 2”-3” wide, and sometimes I sewed two rows of scraps together to make a double wide scrappy strip.  The options are endless!

1-IMG_3953

To make your scrap strip, decide on a “theme” such as Christmas fabric or colors that match a person’s kitchen décor.

dishtowels 1

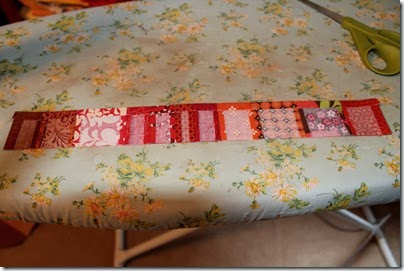
Gather up your scraps, arrange them in a pleasing order, then sew them together using a 1/4” seam allowance, not worrying about perfectly lining up the raw edges like you would when piecing.  Chances are a lot of your scraps won’t be identical sizes, so just do your best to line them up to one side as seen in the photo.  One edge is pretty straight, while the other is not.  Press all your seams open.

1-IMG_2815


You’ll be cutting this strip down to a width you like, 2.5”—3”—3.5”, really the width is up to you.  You might find yourself with smaller scraps and want to add another row, go for it!  Design these scrappy strips however you want.

Once your pieced strip is the desired length, go ahead and trim it down to size.  In my example, the Bobby Flay Dishtowel is approximately 16.5 inches across.  So, I added 1/2” to the measurement and trimmed my scrappy strip down to 17” x 2.5”.  Note:  Sometimes the dishtowels are not perfectly square.  So just do the best you can getting a measurement across.  Remember, you want your strip to be a tiny bit smaller than the measurement so it doesn’t extend pass the sides of the dishtowel, so be conservative when measuring.

1-IMG_2820

Next is the fun part!  Well maybe picking fabric was the most fun, but this part comes in at a close second.  Have you ever used fusible tape?  Me either!  But I happened to have two rolls of it I somehow acquired over the past 5 years of sewing and decided to finally use it already!  The size I used was 1/4”.

2-IMG_2825

Fold in one of the ends of your scrappy strip about 1/4”.  Press this fold to make a very bold crease.  Cut a piece of fusible tape the length of the width of your strip (ie in my case 2.5”).  Cut the tape just a hair shorter than you need to because you don’t want to have any tape outside of the fabric fold when pressing.  I have to be honest, I didn’t really measure any of the lengths, I just eyeballed them and then cut the tape.  Feel free to do the same!

2-IMG_2829

Put the piece of tape in the fold, press down with your iron following the manufacturer’s direction (I held it for about 4 seconds until the tape melted into glue).  Perfect, that fold isn’t going anywhere!

2-IMG_2830

Repeat on the other end of the strip.

Now you have two folded ends that aren’t going to come apart or move around when you’re pinning or sewing!

Do the exact same step now lengthwise down each side of the scrappy strip.  Fold in 1/4” or more (as long as the fold is at least 1/4” it should cover the fusible tape), press and make a bold crease. 

Measure the length before you cut your fusible tape (or just eyeball it!).  It will be different than the original length since you just folded the ends in.   It should be about 1/2” shorter.  Cut a piece of fusible tape just a hair shorter than the measurement.  Put the piece of tape in the fold and press it down to permanently hold the raw edge under.
2-IMG_2832

Repeat for the other side.

2-IMG_2835

2-IMG_2838

Just make sure your fusible tape is a little shorter than the length of the strip so you don’t press over it and glue up your iron or ironing board cover!

2-IMG_2841

Ok, now you have a piece of scrappy wonderfulness that won’t be coming unfolded!

There are two ways you can complete the project from this point on out.  The first way is easier and better for a child sewer or beginner.  The second way is simple too, and can be fast and effective if you have experience with pinning.

Finishing Steps Choice 1:

Use fusible tape to attach the scrappy strip to the dishtowel before sewing.  Cut the fusible tape into 2 pieces—you’ll need a piece just a hair shorter than each of the length of the two longer sizes.   You will not need to fuse down the two shorter sides.

1-IMG_2697-001

Use the fusible tape to glue your strip into place before sewing the strip down permanently.  I just placed the fabric strip where I wanted it, put the fusible tape under each long fold, then pressed until the glue melted and the strip was stuck on.  Be careful not to leave the iron in one place for too long.  These were 100% cotton dish towels, so I didn’t need to worry about delicate synthetic fibers burning. 

Then using a walking foot and sew around the perimeter of the strip using a straight stitch or zig-zag. 

1-IMG_2701

My seven year old daughter, who is pretty experienced using a sewing machine, enjoyed sewing this strip down without getting jabbed by pins.  The extra fusible tape didn’t create any noticeable bulk whatsoever along the edges. 

This is Bea’s dishtowel after washing and drying twice.  Looks good as new!

2-IMG_2885

Finishing Steps Choice 2:

Just pin the strip in place and sew on.  This was the easiest and fastest way for me to do it.  I didn’t have to measure, cut, or iron anything, just pin in place and sew!  I would recommend this way for an adult.

2-IMG_2847

Dishtowels hang from a cabinet handle in our kitchen.  They were tested extensively the past month and a half and held up perfectly.

1-IMG_2715

We made several as gifts for friends and neighbors.  How cute would a Christmas dishtowel look wrapped around a jar of jam for a homemade teacher gift?

1-IMG_2902

I hope you enjoyed this tutorial and are inspired to make a strip of scraps dishtowel too!

Saturday, February 2, 2013

Scrappy X Block Tutorial {perfect for a bee}

1-IMG_0813

Hi there!  In December, I needed to make a scrappy rainbow block for a bee and we could come up with anything on our own.  I had an idea for a scrappy x block and saw something I liked in the book Block Party by Alissa Haight Carlton

The version I came up with is easy peasy and requires no special piecing skills.  The points line up virtually by themselves and this would be a perfect block for a bee.  Plus the only fabric you need besides the background fabric is your scraps!  It doesn’t get much better than that!  Here’s how to make your own.  The final unfinished size is 16 1/2” x 16 1/2”.

1-IMG_0767

***I starch my fabrics before I cut them.  Before cutting, I lightly spray the fabric with starch and then dry press them (no steam).  I have learned over time that if I starch the fabric after cutting or sewing a seam, the fabric might spread out and become slightly bigger than the size I cut, or I get wrinkles. 

Materials:

  • rainbow colored scraps (no white background fabrics, browns, grays, or pastels)
  • four 8 1/2” Kona white squares (you could cut these from a 1/4 yard of fabric)

Steps:

From your white solid fabric, cut four 8 1/2” squares.  Then cut these on the diagonal so you end up with eight triangles.

1-IMG_0798

Cut your scraps into rectangles that are at 2 1/4” wide.  Most of my rectangles were between 2 1/2 and 3 1/2” long.  Vary the lengths so your x looks scrappy.

1-IMG_0783

Sort your scraps into 4 columns about 14” tall.  Sew your rectangles together to make a strip that measures 2 1/4” by about 12 to 13”.  Press the seams open.

1-IMG_0788

These strips need to measure at least 12” long.  Now, trim each strip to measure 2 inches wide.  My thinking here is that you could start with 2” wide rectangles, but sometimes the strips can get a little off when you join the rectangles, so you have 1/4” to play with to make your strips straight and exactly the same width.  Trimming them down perfect will help your points line up, too.

1-IMG_0804

I like to lay out my strips to see what the x is going to look like and make sure the fabrics in the center aren’t too similar.  You can just flip a strip if two of the same color meet up in the middle.

1-IMG_0802

My layout changed when I sewed mine together.  I made this layout at night and then switched it around the next morning when I sat down to sew it.

Pin a strip to the white triangle.  Try not to pull on the fabric as you sew it because the edge of the triangle is stretchy and can become distorted if you pull on it.  Since I starch my fabric I don’t seem to have as much problem with the fabric stretching.

1-IMG_0805

Now, this part is important for getting the points to line up.  Press two quadrants with the seam allowance toward the strip.  Press two quadrants with the seam allowance toward the white.  I did mine in groups of two so I remembered to press the correct way.

1-IMG_0807

Here is a photograph of what the back of the block looks like.

1-IMG_0825

Trim each block 8 1/2” square.  My ruler has a straight line on the diagonal that I just line up down the center of the strip.

1-IMG_0810

The seams will nest up really nicely when you sew two blocks together.  Just press your center seams in opposite directions and those will nest together too.  Press your final seam either up or down and your block should have perfect points and be flat.

1-IMG_0822

Your block should end up 16 1/2” x 16 1/2”.  If you’d like to use this tutorial for a bee, feel free to link to it, but please do not copy this tutorial to your blog.  I’d love to see this block in a controlled color scheme, too.

1-IMG_0815

I’m using this tutorial for Beejeebers this month and can’t wait to put together the blocks to make my very own rainbow scrappy x quilt!

Thursday, November 15, 2012

Seeing Straight

1-003

Have you ever heard someone say, “If you can sew a straight seam, you can make a quilt”?  I can make a quilt, but I can’t seem to sew straight lines very well!

1-001

I attempted to quilt this with parallel vertical lines.  I followed the edge of my walking foot to try to make all the lines evenly spaced, but they are neither perfectly straight or evenly spaced!

1-004

My favorite block is this butter yellow version with the bird in the middle.  Every single piece of every single block was made from scraps only, which I’m kind of proud of.  I almost cracked on the last green block and used some fabric from my stash, but then I pulled myself together and looked through my scraps one more time to find two strips long enough for the last two sides.  Victory!

1-006

The binding is this great Loulouthi stripe I had in my stash.  And the backing is a SSI yellow swirly fabric I bought in my early sewing days.  It’s not something I’d probably buy today, but I’m glad to finally have a use for it! 

1-008

The finished quilt is made of 42 9 1/2 inch blocks and measures 54” x 63”.  It will be gifted at Christmas to relatives visiting my great aunt.  She asked me to make a quilt for them.  Hope they like it!

Linking up to Ellison Lane Quilt’s Scrappy Stash QAL.  Thanks, Jennifer, for putting together such a fun project!

Wednesday, October 13, 2010

Halloween Table Topper

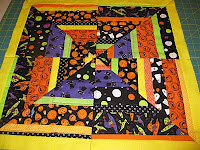
We are going to my sister-in-law's sister's house for a Halloween party. This is an impressive party--lots of kids and tons of creative food and decorations. Since I am huge already (8 months pregnant), I volunteered to bring apple cider with mulling spices (not a lot of cooking involved), I thought I'd make something for Debbie's dining room table. Her table is average size and round, so a table topper would be a much better choice than a table runner. I get up about 2 hours before my family every morning so I have some time to myself and to work on my crafts. I whipped up these two table toppers (I haven't binded them yet) between my morning (deciding on a design and cutting) and my husband taking the kids to the local pond and giving them their bath tonight (making the blocks and quilting):

They didn't take long to make at all and you can just use scraps if you're like me and have quite a few oranges, yellows, and greens in your basket. All of the Halloween prints are leftovers from Halloween trick-or-treat bags I made for my daughters and their friends.

Finished size: 19"x19"
Supplies:

  • the equivalent of 8 jelly roll strips of various Halloweeny fabric (I used all kinds of scraps and cut them all 11 inches long with different widths from about 1 1/4 to 2 1/2 to accomodate some of the bigger Halloween prints) You can double the amount to 16 jelly roll strips to make two table toppers.
  • 2/3 yard for backing Or you could make a scrappy backing.
  • 1/4 yard for binding

Steps:

1. Make 4 (or 8) blocks from your strips that measure about 11 x 11". Press all the seams in one direction.

2. Cut the blocks down to 9 1/2 x 9 1/2 inches square.


3. Cut the blocks from corner to corner on the diagonal to make two triangles.


4. Decide on a design layout with your triangles--I'm not so proficient here, but I think you could make pinwheels or diamonds or whatever shape. I arranged mine to look kind of spider-webby.

5. Join two blocks together and then the remaining two blocks together. Press the seam allowances so that they lie in opposite directions when joining the two halves.

6. Sew the two halves of the table topper together. The center will be thick from all the seam allowances. In order to get my sewing machine through the thickness, I trim out as much seam allowance as I can. Then, when I start sewing, instead of starting at one end of the seam and sewing to the end, I start directly in the middle where the points all meet so I can make sure that the perpendicular seam lines up perfectly. Then I sew from the middle to the other end.

7. Then I sewed on a 1 1/2 inch yellow border. I chose a fabric that wasn't part of the blocks to try to really make the center pop out. You can't really tell from the photo, but the yellow isn't solid--it has some white pindots. My husband said the topper is "trippy."

At this point, once all the borders are on and trimmed/squared, in order to make everything super flat and ready to quilt, I turn on the steam on my iron and press to my heart's content.

8. Layer the batting and backing and quilt as desired. I did two different quilting designs. The first table topper I quilted with straight lines, using painter's tape as a guide. The second table topper I quilted in the ditch when each triangle is joined to the next. Then, I quilted concentric squares which gives the back a kind of spider web design. The second design is my fave. I used painter's tape to make this design, too. I really like painter's tape...if you ever accidentally quilt through it, the perforations from the needle make it a snap to rip off anyway. A great way to sew a straight line or design.

And once you bind it, voila! you're finished and have something great to brighten up a table for Halloween. This is my first tutorial, so feel free to email me any questions.